
-
Shop by category
Explore all dealsExplore this collection for more finds.
View this find
- Amazon Best Sellers
- Under $25
-
Shop by brand
View all brandsExplore this collection for more finds.
View this find
-
eDeals & offers
Explore all dealsExplore this collection for more finds.
View this find
- Shopping guides
- Compare products Free tool
-
Shop by category
Explore all dealsExplore this collection for more finds.
View this find
- Amazon Best Sellers
- Under $25
-
Shop by brand
View all brandsExplore this collection for more finds.
View this find
-
eDeals & offers
Explore all dealsExplore this collection for more finds.
View this find
- Shopping guides
- Compare products Free tool
THE EVERYDAY EDITBed & Bath
How to Fit a Duvet Insert Without Losing Track of the Corners
A practical sequence for checking duvet-cover compatibility, aligning an insert, using attachment points when available, and planning care before making the bed.
Explore the picks
A duvet insert can be the right size on paper and still be frustrating to fit if the cover’s openings, attachment points, or care requirements do not suit your routine. Work through those details before dressing the bed. This process helps you catch a mismatch early, keep the layers aligned, and make the next wash-and-remake cycle easier.
Ad · We may earn a commission. As an Amazon Associate I earn from qualifying purchases.
1. Confirm the cover and insert can work together
Read the size labels on both pieces rather than relying on a shared bed-size name. Compare the stated dimensions: two items labeled queen, for example, might not have identical measurements. If the insert is wider or longer than the cover, the fit may be tight; if it is smaller, excess space may allow it to shift. Decide whether that difference is acceptable for your bed before opening the cover and starting the job.
2. Check the attachment system before turning anything inside out
Look inside the cover for ties or other fasteners, then check the insert for matching loops or tabs. Do not assume that every cover has ties, or that every insert’s attachment points will match a particular cover. If the two sides do not correspond, you can still align the layers by hand, but you will need to expect to straighten them periodically. A quick compatibility check now is easier than discovering the mismatch after the bed is made.
3. Align the insert using one corner at a time
Spread the cover on a clear surface and identify its opening and corners. Feed in the insert without bunching it, then match one insert corner to the corresponding cover corner. Repeat at the far end before adjusting the sides. This corner-first sequence gives you a simple way to spot a twist: if the edges do not run in the same direction, pause and reposition the insert rather than trying to pull the mismatch out from one side.
4. Secure matching points, then check the edges
If the insert and cover have compatible attachment points, fasten them according to the cover’s design. A Bedsure insert listing describes eight tabs on each side for use as a duvet insert; check the actual item and your cover to confirm which points line up. After fastening, lift and settle the filled cover gently, then inspect the corners and edges. If one area looks fuller than another, reopen that section and correct the alignment instead of tightening an unrelated tie.
5. Make laundry and remaking part of the setup
Before washing, check the care instructions for both the insert and cover; do not assume they take the same cycle or drying method. The Bedsure listing says to machine-wash the insert separately in cold water on a gentle cycle and tumble-dry on low. It also advises gently fluffing it and letting it rest for up to 24–48 hours after unpacking. Once everything is dry, repeat the corner-first alignment process rather than putting the insert back by feel.
Before you decide
- Compare the printed dimensions of the insert and cover.
- Check whether the cover has attachment points and whether they match the insert.
- Align corners before adjusting the sides.
- Inspect the edges after fastening, if compatible points are present.
- Follow each item’s care label separately.
A relevant item to explore
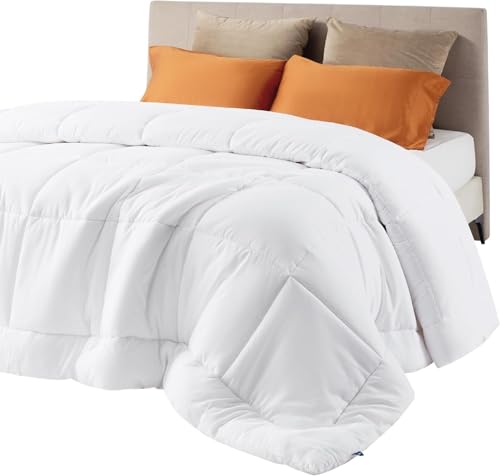
Bedsure Comforter Duvet Insert, Quilted Bedding Blanket, Oeko-TEX
The article uses the supplied Bedsure listing as a specific example of an insert described as having eight tabs on each side, plus stated unpacking and care guidance. It does not establish compatibility with any particular duvet cover.
View the exact item and current retailer offer →
Check the exact variant, seller, included pieces, care instructions and current terms. Purchases and checkout take place with the retailer.
Common questions
Will every duvet cover attach to this insert?
The supplied listing describes eight tabs on each side, but it does not establish that every cover has matching ties or loops. Check both items’ attachment systems before buying or fitting them.
How should the insert be washed?
The Bedsure listing specifies a separate cold-water gentle machine wash and tumble-drying on low. Check the care label on your actual item and the cover’s instructions as well.
Explore this subject
Prepared by Biz E-Deals using product listing information and general shopping considerations. We have not personally tested the item. Listing information can change; confirm details with the retailer.
Lifestyle context photo: Photo by Annie Spratt on Unsplash. The pictured setting and items illustrate the topic; exact featured products are shown separately in this guide.
Your next useful read
Explore shopping guides →
Bed & Bath
How to Set Up a New Bed-in-a-Bag Without Guesswork
A practical sequence for unpacking a compressed comforter set, checking its pieces and fit, and getting the bed ready for its first use.
Read the guide
Bed & Bath
Refresh Your Bed With a Quilt: Fit, Color and Care Checks
A quilt can change the look of a bedroom without requiring a full-room makeover. Use bed measurements, coverage goals, color context and care instr...
Read the guideThe Biz E-Deals edit
Good finds. A little less searching.
Choose your email topics, start with our welcome guide, and join the list for upcoming curated editions.
Savings explained
More to discover
Choose my emails
Choose your email topics on the next page, then confirm in your inbox. Free and optional. No account needed. Privacy policy